Wzory i inspiracje czapek
Czapka brioche + z opisem i fimem

Czapki na drutach ze wzorem


Czapki z otworem na ogon koński

Czapkę robimy jak każdą inną szydełkiem, z tą różnicą, że zaczynamy od obrobienia słupkami gumki do włosów.


Beret szydelkiem ze wzorem


Czapka z daszkiem szydelkiem ze wzorem


Czapka na drutach według Klary - tutorial

Prosta czapka na drutach ze wzorem PDF

Czapka ze wzorem

Czapki szydełkiem z filmem DIY

Czapka damska - english pattern

Cascade Eco+, 100% wool (437m per 250g)
1 x 250g ball in Berry 0508
1 pair each of 4.5mm and 5.5mm needles
Yarn needle
Cardboard
Sharp scissors
Note: Yarn amounts given are based on average requirements and are approximate.
Tension
17 sts and 25 rows to 10cm (4in) over blackberry pattern using 5.5mm needles
Use larger or smaller needles if necessary to obtain correct tension.
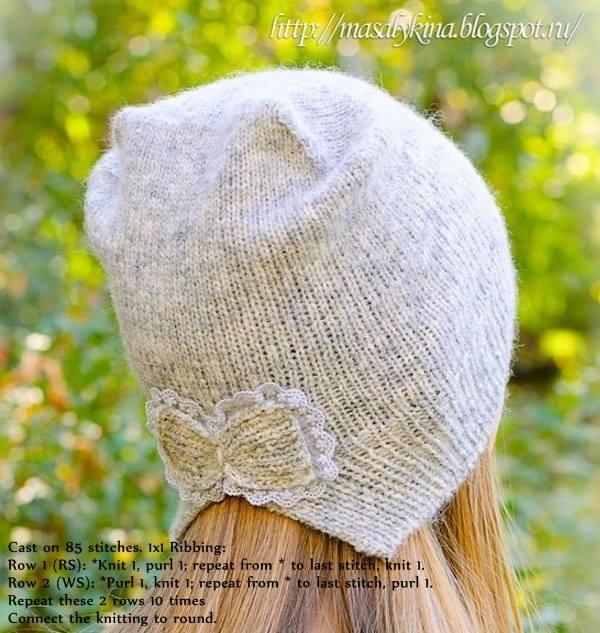
Beanie
With 4.5mm needles, cast on 102 sts.
Row 1 (RS): K1, *k1, p1; rep from * to last st, k1.
Rep row 1 another 32 times, ending with a RS row.
Row 34: K2, p1, m1, [(k1, p1)twice, k1, m1, (p1, k1) twice, p1, m1)9 times, (k1, p1) twice, k1, m1, (p1, k1) twice (122 sts).
Change to 5.5mm needles.
Row 35 (RS): Purl.
Row 36: K1, *inc2 in next stitch, p3tog; rep from * to last st, k1.
Row 37: Purl.
Row 38: K1, *p3tog, inc2 in next st; rep from * to last st, k1.
Rows 35 to 38 set the blackberry pattern.
Rep these four rows another eight times.
Row 71: Purl.
Row 72: K1, *p3tog, k1; rep from * to last st, k1 (62 sts).
Row 73: Purl.
Row 74: K1, (p3tog) 20 times, k1 (22 sts).
Row 75: (P2tog) 11 times (11 sts).
Cut yarn, leaving a long tail, and thread tail through rem 11 sts.
Pompom
Cut two cardboard circles, 12cm (4.75in) in diameter.
Cut a 4.5cm (1.75in) hole in the centre of each to create two rings.
Hold the two rings together and wind yarn evenly through the centre hole and around the edge until the centre hole is full with the wraps. Using scissors, slip the blade between the two pieces of cardboard and carefully snip through all the loops of the wound yarn.
Thread a long length of yarn between the two card rings and around the centre of the pompom, then tie tightly in a firm knot to secure. Remove the cardboard and fluff up the pompom. Trim the pompom with scissors, if necessary, to tidy up the shape.
To finish off
Pull up the tail of yarn at the top, to close up the stitches.
Fasten off securely.
Fold the hat in half, inside out, and match the two edges.
Using the tail, sew the seam on the main part of the hat and the top half of the ribbing using backstitch.
Turn right side out and stitch the lower part of the ribbing with wrong sides together, so that the seam will be on the inside when the ribbed band is turned back. Stitch the pompom firmly to the crown.
Czapka szydełkiem ze wzorem


Aby zrobić ściągacz, nabierz brzeg czapki na okrągłe druty, lub zrób od razu ścieg ściągaczowy szydełkiem

Czapka z kratka szydełkiem
Przykłady rozpoczynania czapek:
Góra - półsłupkami
Dół - słupkami


Czapka z krokodylej łuski ze wzorem


Ciekawy wzór na czapkę

Czapka babelkowa szydełkiem

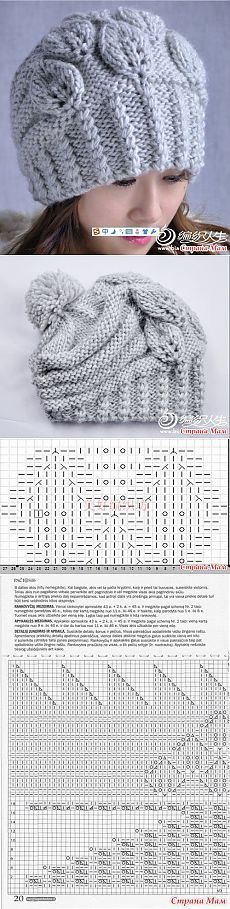
Czapka na drutach z listkami
Fajna męska czapka

Przepaska na głowę na drutach


Początek czapki szydelkiem

Czapka warkoczowa


Czapka z prostokąta - wzor

Szal z kapturem


Bardzo prosta czapka na drutach

Kolorowa i śliczna - wzór i fototutorial

Czapka ściągana kabelkiem - film

Czapki z warkoczem - tutorial


Czapa z grubej wełny


SIZE: One size to fit average woman's head.
Yarn: Bernat "Softee Chunky" (3.5 oz/100 g; 108 yds/99 m)
Color: Clay (28041) 2 balls
Accessories: Size U.S. L/11 (8 mm) crochet hook or size needed to obtain gauge.
Gauge: 7 sc and 8 rows = 4" [10 cm]
Hat is worked in the round from the ribbing upwards. Ribbing is worked sideways into back loops of slip stitches. Textured pattern is worked with dcbp and dcfp stitches.
INSTRUCTIONS
Ribbing: Ch 7.
1 st row: (RS). Working in back loops only, 1 sl st in 2nd ch from hook. 1 sl st in each ch across. Turn. 6 sts.
2nd row: Working in back loops only, 1 sl st in each of next 6 sl sts. Turn.
Rep 2nd row until work from beg measures 21" [53.5 cm], ending on a WS row. Do not fasten off.
Join back seam: Working in back loops only, sl st last row and rem loops of foundation ch tog. Do not fasten off. Turn work and proceed as follows:
Note: Ch 3 at beg of rnd does not count as st. (See diagram)
1 st rnd: Ch 3. Work 40 dc evenly around. Join with si st to first dc. 40 dc.
2nd rnd: Ch 3. (1 dcfp around each of next 3 sts. 1 dcbp around each of next 2 dc) 8 times. Join with sl st to first dcfp.
3rd rnd: Ch 3. (1 dcbp around next st. 1 dcfp around each of next 3 sts. 1 dcbp around next st) 8 times. Join with sl st to first dcbp.
4rd rnd: Ch 3. (1 dcbp around each of next 2 sts. 1 dcfp around each of next 3 sts) 8 times. Join with sl st to first dcbp.
5th rnd: Ch 3. (1 dcfp around next st. 1 dcbp around each of next 2 sts. 1 dcfp around each of next 2 sts) 8 times. Join with sl st to first dcfp.
6th rnd: Ch 3. (1 dcfp around each of next 2 sts. 1 dcbp around each of next 2 sts. 1 dcfp around next st) 8 times. Join with sl st to first dcfp.
Rep last 5 rnds until work from beg measures approx 8" [20.5 cm], ending on 6th rnd.
Shape top: 1st rnd: Ch 3. (1 dcfp around each of next 3 sts. Skip next st. 1 dcbp around next st) 8 times. Join with sl st to first dcfp. 32 sts.
2nd rnd: Ch 3. (1 dcfp around each of next 3 sts. Skip next st) 8 times. Join with sl st to first dcfp. 24 sts.
3rd rnd: Ch 3. (1 dcfp around each of next 2 sts. Skip next st) 8 times. Join with sl st to first dcfp. 16 sts.
Fasten off leaving a long end. Draw end tightly through rem sts and fasten securely.
Pompom
Wind yarn around 4 fingers approx 100 times. Tie tightly in the middle and leave a long end for attaching to Hat. Cut loops at both ends and trim to smooth round shape. Sew securely to top of Hat.

Koronkowy beret - wzor

Czapka z warkoczem poziomym na drutach

Czapka z warkoczami na drutach

INSPIRACJE
Genialna czapka na drutach

Bardzo proste czapeczki na drutach


Świetna czapa uszatka

Czapka z guzikami - inspiracja

Prześwietna czapka na drutach

Kokardka i cudo jest
Pompon i hafcik dodają uroku tej czapce

Ściągacz czapki mógłby być szerszy do tej fajnej całości


GGW Fashion Gallery

GGW Fashon Gallery

Te uszki!

GGW Gallery

GGW Gallery

Warkocz świetnie zdobi.

GGW Gallery

GGW Gallery

Ach ten pompon do tych kopniętych kwadratów!

No lubię pompony, a jeszcze w takim miejscu - pycha!

GGW Gallery

GGW Gallery


Inspiracje
Przepiękny komin ze względu na ścieg i kolor

Komin żakardowy


Żakardowa czapka szydelkiem

Noami Cambel w świetnej czapce z bardzo grubej wełny szydełkiem
To kask właściwie z doszytymi kwiatami szydełkowymi

Czapa na drutach z bardzo grubej wełny- inspiracja

Czapka pomarańczowa bardzo ciekawa, ale nie mogę rozgryźć sposobu robienia, chociaż nie jestem początkującą dziewiarką.
OdpowiedzUsuńNie jest trudna,trzeba spuszczać prawe oczka następnie dodawać ,fakt trochę wprawy trzeba mieć.Jak znajdę schemat to mogę wstawić.
UsuńO tak! Bardzo prosimy Elusia.
UsuńJak mamy 14 oczek prawych na końcu trójkąta,zmniejszamy w każdym nieparzystym rzędzie,czyli na prawej stronie robótki w ten sposób:oczko prawe narzut, przerób dwa oczka razem na prawo, obróć i przerabiaj z powrotem,czyli oczka lewe do końca rzędu,w następnym rzędzie będzie 1 oczko prawe ,narzut,1oczko prawe ,2 oczka razem na prawo,odwróć i przerabiaj z powrotem czyli oczka lewe,itd.Opisałam tylko początek zmniejszania trójkąta,mam nadzieję,że jakoś zrozumiale.
Usuńzapomniałam dodać,że blog przeswietny i cudowne wzory,bardzo często z nich korzystam
UsuńPrzepraszam ,wkradł mi się błąd ,oczka lewe nie do końca rzędu,tylko lewe nad lewymi prawe nad prawymi
UsuńWszystkie piękne
OdpowiedzUsuńDziękuję. Bardzo starannie wybieram to co pokazuję.
UsuńWitam! Jak wykonać wzor pióra. Niestety ten zamieszczony ma nieczytelny opis do schematu. Czy mogę dostać to na e-maila
OdpowiedzUsuńWitam wszystkie są piękne ale interesuje mnie szara z bąbelkami można dostać schemat na e-maila cieplutko pozdrawiam
OdpowiedzUsuńJeśli mam wzory są zamieszczane tu.
Usuń